
This post is here to teach you how to not only install Strongswan 5.9.8 on Raspberry Pi OS, but also to use swanctl and swanctl.conf instead of ipsec.conf (which is the default legacy package) to future proof your install. I’ll also form a basic IKEv2 PSK based tunnel as a proof of concept.
Strongswan is a great open-sourced based VPN daemon and is super easy to configure and scale – I love it in my lab to quickly form a tunnel with my enterprise devices and use a dummy interface to simulate client traffic. It’s flexible and can be set up very quickly.
Pre-requisites
This guide assumes you already have a Raspberry Pi set up with Raspberry Pi OS. If you don’t yet, you can set that up following the instructions at this guide – Installing Raspberry Pi OS and SSHing into a Raspberry Pi.
Installing Strongswan
This guide is easier to follow using the root user for all commands, otherwise, add “sudo” to most/all commands used here.
First we’re going to want to become a superuser, and then start our installs. Run these one by one – note that the default Strongswan package includes just the legacy ipsec daemon, so we’re going to also install charon-systemd and strongswan-swanctl, and then remove the conflicting packages after it’s installed.
Press “Y” whenever prompted.
sudo su
apt-get update
apt-get upgrade
apt install strongswan strongswan-pki libcharon-extra-plugins libstrongswan-extra-plugins charon-systemd strongswan-swanctl
apt remove strongswan-starter strongswan-charon
Enabling IP packet forwarding
IP packet forwarding allows your device to forward packets across interfaces – for a lab environment this is great to simulate different subnets with dummy interfaces, or if you have a multi port Raspberry Pi, it can be used to route between ports as well.
In /etc/sysctl.conf, there is going to be a commented out line “# net.ipv4.ip_forward=1” – we want to use our favourite text editor to remove the # infront of this. Alternatively, feel free to use this sed command to change it for you:
sed -i '/^#net.ipv4.ip_forward=1/s/^#//' /etc/sysctl.confThen we’ll want to save changes and run the following to write that change into relevant files and to be persistent across reboots.
sysctl -pModifying /etc/strongswan.conf
Now, we want to work on the /etc/strongswan.conf file – this file contains global definitions used for all peers. We’re going to just add some basic definitions file, which I’ll explain in a bit more detail below. The full list of possible configurations can be found here on Strongswans docs.
charon {
    load_modular = yes
    plugins {
        include strongswan.d/charon/*.conf
    }
    filelog {
        stdout {
            path = /var/log/strongswan.log
            time_format = %b %e %T
            ike_name = yes
            append = yes
            default = 2
            flush_line = yes
        }
    }
}

include strongswan.d/*.conf
All of Strongswans default plugins are defined in strongswan.d/charon/*.conf – put simply, these plugins are how Charon does most of its actions.
time_format = %b %e %T makes the logs show neatly in the file output of your choice. path = /var/log/strongswan.log enables logs at /var/log/strongswan.log – you can choose any filename, or by default it’ll send into /var/log/syslog. “default = 2” refers to the level of logs. -1 = nothing, 4 = everything. These can be controlled granularly per subsystem type. You can read more here.
Modifying /etc/swanctl/swanctl.conf
Swanctl.conf is where all of the individual peer definitions are made. They follow a hiearchy of:
connection {
  ike{
    child{
secrets{.
This is where we’ll add the remote IPs, Phase 1/2 Encryption/Authentication/PSKs, and everything in-between. This file is very particular with spacing, so if you get errors when trying to load the file, ensure that all spacing is correct.
An example config can be found below – this config forms a tunnel with a Cisco Meraki MX with IP 192.168.60.5, on IKEv2.
Phase 1:
It uses AES256 for Encryption, SHA256 Autentication, DH group 14, and a lifetime of 28800 seconds.
Phase 2:
It uses AES256 for Encryption, SHA256 Authentication, PFS 14, and a lifetime of 3600 seconds.
It also uses a PSK, defined at the bottom.
connections {
  Phase1-Meraki {
    local_addrs=192.168.10.11
    remote_addrs=192.168.60.5
    version=2
    proposals=aes256-sha256-modp2048

    local {
      id=192.168.10.11
      auth=psk
    }

    remote {
      id=192.168.60.5
      auth=psk
    }

    children {
      Phase2-Meraki {
        local_ts=10.68.69.0/24
        remote_ts=192.168.12.0/24
        esp_proposals=aes256-sha256-modp2048
        life_time=3600
      }
    }
  }
}
secrets {
  ike-1 {
    secret = "MerakiTunnel"
  }
}
Enable Strongswan and form an IKEv2 tunnel
Now that you’ve done all this, you can enable and start Strongswan. Once enabled, it’s always good to run swanctl -q and swanctl -r – this will reload credentials, and reload strongswan.conf settings. If successful, you should see something like this after your swanctl -q and swanctl -r commands:
systemctl enable strongswan
systemctl start strongswan
swanctl -q
swanctl -r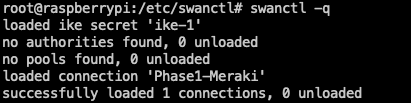
Forming a IKEv2 tunnel with a Cisco Meraki MX
Now that all config is validated, and we’ve configured the same thing on the Cisco Meraki MX, it’s time to form the tunnel. You can manually initiate the tunnel using swanctl with the following syntax:
swanctl -i -i Phase1-Meraki -c Phase2-Meraki
or
swanctl --initiate --ike Phase1-Meraki --child Phase2-Meraki
(where Phase1-Meraki is the Phase 1 definition name in swanctl.conf, and Phase2-Meraki is the Phase 2 definition name in swanctl.conf)
If the config matches on both sides, you’ll see something like this, and the tunnel will be formed.

To see more information about the currently formed tunnel, run this command
swanctl -l
or
swanctl --list-sas
This shows a good overview of everything about the tunnel, from expiry, to ESP encryption type, to SPI values, to packets in/out.
If the tunnel didn’t form successfully, check the output of /var/log/strongswan.log, which will generally give some clues to why the tunnel did form, and confirm all config matches as expected.
Caveats
If your remote peer is over the internet, you will likely need to configure Port forwarding on the upstream router(s) for UDP 500 and UDP 4500.
Summary
In this tutorial we were able to install Strongswan and swanctl on Raspberry Pi OS. We configured swanctl.conf and strongswan.conf and formed a IKEv2 tunnel to a Cisco Meraki MX.
This entire set up is super easy, and took no more than 10 minutes!
Raspberry Pis are very capable of being a lab device for proof of concept IKEv1 and IKEv2 Tunnels to enterprise devices, and with dummy interfaces you can stimulate real traffic and rekey conditions.
Get notified whenever I post something new. No spam, and it helps a lot!


Leave a Reply