This post will show you how to form an eBGP relationship between a Cisco Meraki MX and a Raspberry Pi. For this tutorial, I’ll be using the open sourced BIRD Routing Daemon that is freely available on all Linux distributions. It’s very quick and simple to set up and is a great way to perform BGP tests and otherwise test your Cisco Meraki environment before staging it into production with a easy to obtain, cheap device such as a Raspberry Pi.
I’ll also include sample config to use on both sides for a simple setup – Cisco Meraki’s BGP solution does not allow you to narrow down the imported or exported routes, so any customisation like this will need to be done on the Bird side.
BIRD is a Routing Information Base (RIB) that allows you to handle and route network traffic. It supports BGP, OSPF and RIP – but this guide will focus on a base set of config for BGP.
Pre-requisites
This guide assumes that you have already installed BIRD. If you haven’t, you can follow a step by step guide on how to here – How to Install and Configure the BIRD Routing Daemon (BGP) on Raspberry Pi OS
Configuring Routing on the Cisco Meraki dashboard
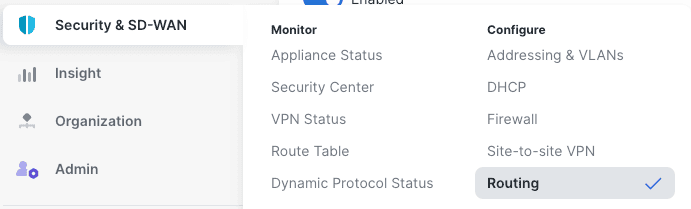
First, lets configure the Cisco Meraki side – you’ll want to go to Security & SD-WAN –> Routing, and enable BGP. From here, you can then configure your BGP VPN AS, and the iBGP Holdtimer. the AS can basically be any number you’d like, but note that this is an organisation wide setting. The Holdtimer is specifically for iBGP (AutoVPN), but 240 seconds is the default, and it’s fine to keep it as this.
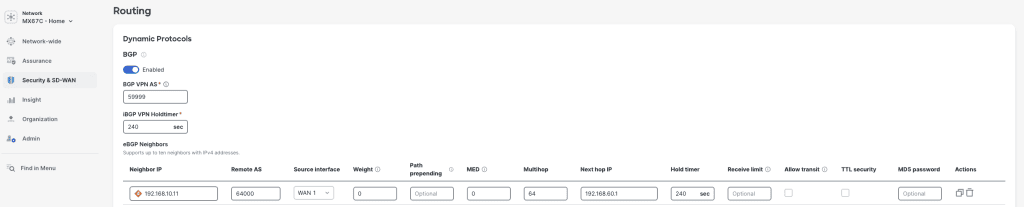
Then, we’ll want to configure an eBGP Neighbor. Configure the IP that the MX will be reaching (ie: our Raspberry Pi IP), the Remote AS that you want to configure (also can be any number). The Source interface is where you want to reach the peer from, which can be the WAN or a LAN VLAN IP – in my case, I’ll do WAN 1.
AS Path Prepending is used to influence traffic inbound by artificially extending the as AS path length. When routes are advertised to a peer, additional AS numbers are appended to the existing AS path. As BGP prefers shorter AS paths when calculating BGP best path algorithm, AS Path Prepending is able to influence advertised routes appearing appear less or more desirable to a peer. The AS Path Prepend list supports up to 10, 4 byte unsigned, space separated AS numbers.
Multi-Exit discriminator (MED) is used to influence traffic inbound by signaling a suggested entry point to a peer, When advertising routes to a peer an additional attribute value is included with the routes advertised. The med value is a 4 byte unsigned number, a lower MED value is preferred to a higher one.
Weight is a Cisco propriety metric used locally influence inbound route priority. As weight is locally significant, it is not advertised to external peers. As each MX can assign it’s own weight to a peer, it gives the ability to influence the sites routing path to a common peer but not the entire AS. Weight is a value from 0 to 49 with a higher weight being a more preferred path.
Since I’m not using any of these, I use the defaults – a weight of 0, no Path prepending, and a MED of 0 as well.
Multihop refers to how many hops away the device is from the MX – if its directly connected then a hop of 1 is completely fine, but if it’s multiple hops away then a higher number will be required. When it’s more than one hop, you can use a higher number than 1, long as the other side is configured the same. My device is more than 1 hop away, so I’m going to use a Multihop of 64, and configure the Next hop IP as my upstream gateway. Hold timer can be set as anything, long as its the same on both sides, so I’ve also set it as 240.
Receive Limit sets a max amount of routes to be received from the other peer. Allow transit allows the routes to be shared from one eBGP peer to another. TTL security/MD5 password are security settings that are optional.
Once you’ve set all of this, make sure to Save changes at the bottom of the page.
Configuring /etc/bird/bird.conf
Now, on the Raspberry Pi side we’ll need to configure matching configuration that matches what we set on the Cisco Meraki dashboard.
Here’s a base config that will work and is good for basic lab setups. It imports and exports all routes from the kernel routing table every 20 seconds, advertises a static route 192.0.2.0/24 to BGP peers, and has eBGP config for a Cisco Meraki MX67C – it forms a eBGP relationship using its own AS 64000 and 192.168.10.11, with a hold time of 240 seconds, multihop of 64 – the MX67C has IP 192.168.60.5, with AS 59999. It imports all routes besides 192.1.2.0/24 and 192.1.2.0/25, and exports all routes it has.
protocol kernel {
  scan time 20;
  ipv4 {
    import all;
    export all;
  };
}

protocol static {
  ipv4;
  route 192.0.2.0/24 via 192.168.10.1; #192.168.60.8 for normal ebgp
}

protocol device {
  scan time 10;
}

protocol direct {
  ipv4;
}

protocol bgp MX67C {
  local as 64000;
  router id 192.168.10.11;
  hold time 240;
  multihop 64;
  neighbor 192.168.60.5 as 59999;
  ipv4 {
    export filter {
     if (net = 192.1.2.0/24 || net = 192.1.2.0/25) then reject;
     else accept;
    };
    import all;
  };
}
Once you’ve added this, save changes to the file, run bird conf to reload the current config file.
Forming the relationship and Basic Troubleshooting
After doing this, the tunnel just needs to form, which the MX and Raspberry Pi will both try to do automatically. Take packet captures on the Cisco Meraki dashboard for the interface you’re forming the tunnel on, and look for TCP packets on TCP 179.
– If you don’t see these, check for firewall rules on both devices.
– If you see intermittent no replies, check for QoS settings blocking traffic upstream.
– If you see the routes not being exchanged? Check if the packet size is too big and its an MTU issue upstream.
– Make sure that you can ping the other side (pinging is not required, but can check routability).
root@raspberrypi:~# birdc show proto
BIRD 2.0.12 ready.
Name Proto Table State Since Info
kernel1 Kernel master4 up 10:28:45.191
static1 Static master4 up 10:28:45.191
device1 Device --- up 10:28:45.191
direct1 Direct --- up 10:28:45.191
MX67C BGP --- up 10:28:49.672 Established

#This shows an overview of all protocols configured - Established means that the relationship was successful with the Cisco Meraki MX.
root@raspberrypi:~# birdc show protocol all MX67C
BIRD 2.0.12 ready.
Name Proto Table State Since Info
MX67C BGP --- up 10:28:49.672 Established
Router ID: 192.168.10.11
BGP state: Established
Neighbor address: 192.168.60.5
Neighbor AS: 59999
Local AS: 64000
Neighbor ID: 0.0.70.192
Local capabilities
Multiprotocol
AF announced: ipv4
Route refresh
Graceful restart
4-octet AS numbers
Enhanced refresh
Long-lived graceful restart
Neighbor capabilities
Multiprotocol
AF announced: ipv4
Route refresh
Graceful restart
Restart time: 120
AF supported: ipv4
AF preserved:
4-octet AS numbers
Enhanced refresh
Long-lived graceful restart
Session: external multihop AS4
Source address: 192.168.10.11
Hold timer: 226.531/240
Keepalive timer: 68.143/80
Channel ipv4
State: UP
Table: master4
Preference: 100
Input filter: ACCEPT
Output filter: (unnamed)
Routes: 1 imported, 2 exported, 1 preferred
Route change stats: received rejected filtered ignored accepted
Import updates: 1 0 0 0 1
Import withdraws: 0 0 --- 0 0
Export updates: 3 1 0 --- 2
Export withdraws: 0 --- --- --- 0
BGP Next hop: 192.168.10.11
IGP IPv4 table: master4
#This shows a more indpeth view of the establishment to the Cisco Meraki MXroot@raspberrypi:~# birdc show route protocol MX67C
BIRD 2.0.12 ready.
Table master4:
192.168.12.0/24 [MX67C 10:28:49.677 from 192.168.60.5] * (100) [AS59999i]
#This shows the routes learnt from the Cisco Meraki MXroot@raspberrypi:~# birdc show route export MX67C
BIRD 2.0.12 ready.
Table master4:
192.0.2.0/24 unicast [static1 10:28:45.191] * (200)
via 192.168.10.1 on wlan0
192.168.10.0/24 unicast [direct1 10:28:45.201] * (240)
dev wlan0
root@raspberrypi:~#
#This shows the routes we're sending to the Cisco Meraki MXConclusion
It’s very easy to create a base config to form an eBGP peer with Cisco Meraki and test routability. You can then use this with AutoVPN spokes to test routes being shared via iBGP, to perform a full lab based scenario testing of a Spoke reaching a Hub via iBGP, and sending traffic to a peer via eBGP.
Raspberry Pis are very capable of being a lab device for proof of concepts, but are also very capable devices and should be a staple of any Network Engineers kit.
If you’re looking for a lightweight, open-source BGP daemon for labs or testing in Enterprise environments such as Cisco Meraki, BIRD with Raspberry Pi is an excellent choice.
Get notified whenever I post something new. No spam, and it helps a lot!


Leave a Reply