
This post is here to teach you how to install the BIRD routing daemon on Raspberry Pi OS. These instructions will also work on any Ubuntu and Debian based installation.
I will also give a base set of config to form a simple eBGP relationship with another peer. BIRD is incredibly easy to set up quickly and efficiently to test eBGP configuration with other peers.
I’ll also show an example of forming a eBGP peering with a Cisco Meraki MX, and how to configure that on the Cisco Meraki dashboard as well.
BIRD is a Routing Information Base (RIB) that allows you to handle and route network traffic. It supports BGP, OSPF and RIP – but this guide will focus on a base set of config for BGP.
As usual, my lab Raspberry Pi Zero will be used for this, showing how a lightweight lab device can be used to complement Enterprise, Lab and Staging environments to quickly test proof of concepts before sending it to production.
Installing BIRD
First, we’ll want to update/upgrade all current packages, and then install bird2 (the latest BIRD daemon as of July 2025). -y will automatically say “yes” to any “yes” or “no” questions on Ubuntu and Debian based systems.
sudo apt update && sudo apt upgrade -y
sudo apt install bird2 -y
Once installed, we’ll want to Enable and Start the daemon. You can then confirm the status and to ensure that it’s running correctly.
sudo systemctl enable bird
sudo systemctl start bird
sudo systemctl status bird
This set of commands will enable the daemon, start the daemon, and then check the status of the daemon.
root@raspberrypi:/home/burstbytes# sudo systemctl status bird
● bird.service - BIRD Internet Routing Daemon
Loaded: loaded (/lib/systemd/system/bird.service; enabled; preset: enabled)
Active: active (running) since Tue 2025-07-15 10:00:39 AEST; 25min ago
Process: 3457 ExecStartPre=/usr/lib/bird/prepare-environment (code=exited, status=0/SUCCESS)
Process: 3463 ExecStartPre=/usr/sbin/bird -p (code=exited, status=0/SUCCESS)
Main PID: 3464 (bird)
Tasks: 1 (limit: 382)
CPU: 484ms
CGroup: /system.slice/bird.service
└─3464 /usr/sbin/bird -f -u bird -g bird
If everything installed correctly, we should see the daemon set to “Active (running)”. If it doesn’t, the logging will be shown in journalctl – run something like journalctl | grep bird to see any clear logging that would indicate a problem.
Configuring /etc/bird/bird.conf
/etc/bird/bird.conf is where all Bird related config will be configured, including peer configs, routes to inject, routes to install, and what routes to accept and decline.
Here’s a base config that will work and is good for basic lab setups. It imports and exports all routes from the kernel routing table every 20 seconds, advertises a static route 192.0.2.0/24 to BGP peers, and has eBGP config for a Cisco Meraki MX67C – it forms a eBGP relationship using its own AS 64000 and 192.168.10.11, with a hold time of 240 seconds, multihop of 64 – the MX67C has IP 192.168.60.5, with AS 59999. It imports all routes besides 192.1.2.0/24 and 192.1.2.0/25, and exports all routes it has.
Remove everything in the current file, and add this using your favourite text editor:
protocol kernel {
  scan time 20;
  ipv4 {
    import all;
    export all;
  };
}

protocol static {
  ipv4;
  route 192.0.2.0/24 via 192.168.10.1; #the next hop must be valid - my upstream gateway in this example
}

protocol device {
  scan time 10;
}

protocol direct {
  ipv4;
}

protocol bgp MX67C {
  local as 64000;
  router id 192.168.10.11;
  hold time 240;
  multihop 64;
  neighbor 192.168.60.5 as 59999;
  ipv4 {
    export filter {
     if (net = 192.1.2.0/24 || net = 192.1.2.0/25) then reject;
     else accept;
    };
    import all;
  };
}
Save changes to the file, and then run birdc conf to reload the current config file.
Cisco Meraki side configuration
On the Cisco Meraki dashboard, you can follow this basic config to match the configuration above.
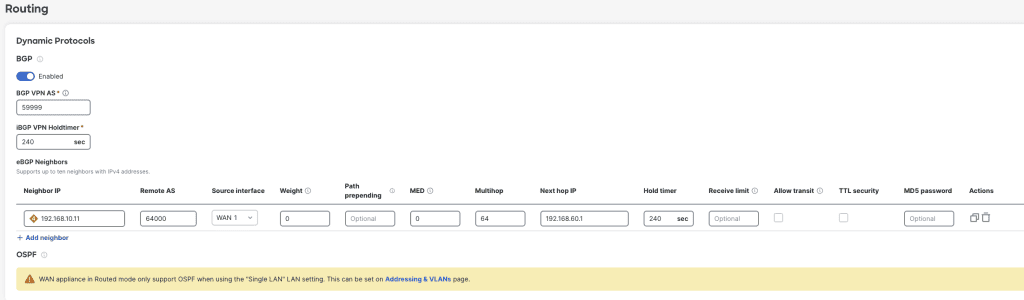
Forming the eBGP tunnel using BIRD and Cisco Meraki
Once this has been configured on both sides, BIRD should automatically try to form the tunnel. You’ll ned to be a little patients with higher Hold timer windows, and saving configurations on both sides. Take a packet capture on the correct interface using tcpdump and keep an eye out for BGP packets. A successful exchange should look like this:
root@raspberrypi:/home/burstbytes# tcpdump -nei wlan0 port 179
tcpdump: verbose output suppressed, use -v[v]… for full protocol decode
listening on wlan0, link-type EN10MB (Ethernet), snapshot length 262144 bytes
10:16:00.907950 b8:27:eb:ff:87:7c > 08:f1:b3:dc:fa:c0, ethertype IPv4 (0x0800), length 74: 192.168.10.11.48866 > 192.168.60.5.179: Flags [S], seq 2169256086, win 64240, options [mss 1460,sackOK,TS val 3532119938 ecr 0,nop,wscale 6], length 0
10:16:00.916339 08:f1:b3:dc:fa:c0 > b8:27:eb:ff:87:7c, ethertype IPv4 (0x0800), length 74: 192.168.60.5.179 > 192.168.10.11.48866: Flags [S.], seq 2564974920, ack 2169256087, win 65160, options [mss 1460,sackOK,TS val 4018211879 ecr 3532119938,nop,wscale 8], length 0
10:16:00.916603 b8:27:eb:ff:87:7c > 08:f1:b3:dc:fa:c0, ethertype IPv4 (0x0800), length 66: 192.168.10.11.48866 > 192.168.60.5.179: Flags [.], ack 1, win 1004, options [nop,nop,TS val 3532119947 ecr 4018211879], length 0
10:16:00.917191 b8:27:eb:ff:87:7c > 08:f1:b3:dc:fa:c0, ethertype IPv4 (0x0800), length 119: 192.168.10.11.48866 > 192.168.60.5.179: Flags [P.], seq 1:54, ack 1, win 1004, options [nop,nop,TS val 3532119948 ecr 4018211879], length 53: BGP
10:16:00.926292 08:f1:b3:dc:fa:c0 > b8:27:eb:ff:87:7c, ethertype IPv4 (0x0800), length 123: 192.168.60.5.179 > 192.168.10.11.48866: Flags [P.], seq 1:58, ack 1, win 255, options [nop,nop,TS val 4018211891 ecr 3532119947], length 57: BGP
10:16:00.926478 b8:27:eb:ff:87:7c > 08:f1:b3:dc:fa:c0, ethertype IPv4 (0x0800), length 66: 192.168.10.11.48866 > 192.168.60.5.179: Flags [.], ack 58, win 1004, options [nop,nop,TS val 3532119957 ecr 4018211891], length 0
10:16:00.929084 08:f1:b3:dc:fa:c0 > b8:27:eb:ff:87:7c, ethertype IPv4 (0x0800), length 66: 192.168.60.5.179 > 192.168.10.11.48866: Flags [.], ack 54, win 255, options [nop,nop,TS val 4018211892 ecr 3532119948], length 0
10:16:00.929272 b8:27:eb:ff:87:7c > 08:f1:b3:dc:fa:c0, ethertype IPv4 (0x0800), length 85: 192.168.10.11.48866 > 192.168.60.5.179: Flags [P.], seq 54:73, ack 58, win 1004, options [nop,nop,TS val 3532119960 ecr 4018211892], length 19: BGP
10:16:00.930518 08:f1:b3:dc:fa:c0 > b8:27:eb:ff:87:7c, ethertype IPv4 (0x0800), length 85: 192.168.60.5.179 > 192.168.10.11.48866: Flags [P.], seq 58:77, ack 54, win 255, options [nop,nop,TS val 4018211894 ecr 3532119957], length 19: BGP
10:16:00.933158 08:f1:b3:dc:fa:c0 > b8:27:eb:ff:87:7c, ethertype IPv4 (0x0800), length 66: 192.168.60.5.179 > 192.168.10.11.48866: Flags [.], ack 73, win 255, options [nop,nop,TS val 4018211898 ecr 3532119960], length 0
10:16:00.974146 b8:27:eb:ff:87:7c > 08:f1:b3:dc:fa:c0, ethertype IPv4 (0x0800), length 66: 192.168.10.11.48866 > 192.168.60.5.179: Flags [.], ack 77, win 1004, options [nop,nop,TS val 3532120005 ecr 4018211894], length 0
10:16:00.981104 08:f1:b3:dc:fa:c0 > b8:27:eb:ff:87:7c, ethertype IPv4 (0x0800), length 136: 192.168.60.5.179 > 192.168.10.11.48866: Flags [P.], seq 77:147, ack 73, win 255, options [nop,nop,TS val 4018211945 ecr 3532120005], length 70: BGP
10:16:00.981263 b8:27:eb:ff:87:7c > 08:f1:b3:dc:fa:c0, ethertype IPv4 (0x0800), length 66: 192.168.10.11.48866 > 192.168.60.5.179: Flags [.], ack 147, win 1003, options [nop,nop,TS val 3532120012 ecr 4018211945], length 0
10:16:00.985076 b8:27:eb:ff:87:7c > 08:f1:b3:dc:fa:c0, ethertype IPv4 (0x0800), length 117: 192.168.10.11.48866 > 192.168.60.5.179: Flags [P.], seq 73:124, ack 147, win 1003, options [nop,nop,TS val 3532120015 ecr 4018211945], length 51: BGP
10:16:00.989054 08:f1:b3:dc:fa:c0 > b8:27:eb:ff:87:7c, ethertype IPv4 (0x0800), length 66: 192.168.60.5.179 > 192.168.10.11.48866: Flags [.], ack 124, win 255, options [nop,nop,TS val 4018211953 ecr 3532120015], length 0
10:16:00.989308 b8:27:eb:ff:87:7c > 08:f1:b3:dc:fa:c0, ethertype IPv4 (0x0800), length 89: 192.168.10.11.48866 > 192.168.60.5.179: Flags [P.], seq 124:147, ack 147, win 1003, options [nop,nop,TS val 3532120020 ecr 4018211953], length 23: BGP
10:16:00.992960 08:f1:b3:dc:fa:c0 > b8:27:eb:ff:87:7c, ethertype IPv4 (0x0800), length 66: 192.168.60.5.179 > 192.168.10.11.48866: Flags [.], ack 147, win 255, options [nop,nop,TS val 4018211957 ecr 3532120020], length 0
If you see TCP resets, then usually it’s a configuration mismatch. If you see unidirectional traffic, make sure the daemons enabled and that theres no routing reachability problems upstream. Also make sure you’re not using TCP 179 for any other service.
You can check the status of the specific peer with these two commands, depending on how much information you need. “Established” is the only log that means the peering has formed successfully.
root@raspberrypi:/home/burstbytes# birdc show proto MX67C
BIRD 2.0.12 ready.
Name Proto Table State Since Info
MX67C BGP --- up 10:16:00.930 Established
You can see more information by adding the “all” syntax:
root@raspberrypi:/home/burstbytes# birdc show proto all MX67C
BIRD 2.0.12 ready.
Name Proto Table State Since Info
MX67C BGP --- up 10:16:00.930 Established
Router ID: 192.168.10.11
BGP state: Established
Neighbor address: 192.168.60.5
Neighbor AS: 59999
Local AS: 64000
Neighbor ID: 0.0.70.192
Local capabilities
Multiprotocol
AF announced: ipv4
Route refresh
Graceful restart
4-octet AS numbers
Enhanced refresh
Long-lived graceful restart
Neighbor capabilities
Multiprotocol
AF announced: ipv4
Route refresh
Graceful restart
Restart time: 120
AF supported: ipv4
AF preserved:
4-octet AS numbers
Enhanced refresh
Long-lived graceful restart
Session: external multihop AS4
Source address: 192.168.10.11
Hold timer: 126.415/240
Keepalive timer: 8.555/80
Channel ipv4
State: UP
Table: master4
Preference: 100
Input filter: ACCEPT
Output filter: (unnamed)
Routes: 1 imported, 2 exported, 1 preferred
Route change stats: received rejected filtered ignored accepted
Import updates: 1 0 0 0 1
Import withdraws: 0 0 --- 0 0
Export updates: 3 1 0 --- 2
Export withdraws: 0 --- --- --- 0
BGP Next hop: 192.168.10.11
IGP IPv4 table: master4
And we can see that we are sending out the configured static route by using this command:
root@raspberrypi:/var/log/journal# birdc show route export MX67C
BIRD 2.0.12 ready.
Table master4:
192.0.2.0/24 unicast [static1 10:14:23.210] * (200)
via 192.168.10.1 on wlan0
Conclusion
In this tutorial we were able to install the BIRD routing Daemon on Raspberry Pi OS. We configured /etc/bird/bird.conf to form a eBGP relationship with a particular route.
This entire set up is super easy, and took no more than 10 minutes!
Raspberry Pis are very capable of being a lab device for proof of concepts, but are also very capable devices and should be a staple of any Network Engineers kit.
If you’re looking for a lightweight, open-source BGP daemon for labs or testing in Enterprise environments such as Cisco Meraki, BIRD with Raspberry Pi is an excellent choice.
Get notified whenever I post something new. No spam, and it helps a lot!



Leave a Reply