This post is designed to show you how to easily form an IKEv2 tunnel with a Cisco Meraki MX using Strongswan / swanctl with a lab Linux device of your choosing. In my case, I’m going to use the Raspberry Pi that I’ve set up in previous blog posts, but the steps would be virtually identical on Ubuntu, and similar on other Linux based distros.
Pre-requisites
1. You already have a Linux-based device set up to be the other peer of the MX. If you don’t – set up a Raspberry Pi following this blog post – Installing Raspberry Pi OS and SSHing into a Raspberry Pi.
2. You already have Strongswan installed with swanctl – otherwise, you can learn how to do this at my other blog post – Configuring Strongswan 5.9.8 with swanctl on Raspberry Pi OS – the steps are very similar for Ubuntu.
3. You have an online Cisco Meraki MX.
Configuring the Cisco Meraki MX for an IKEv2 tunnel
First, we need to configure the MX for a IKEv2 tunnel. Head over on the Cisco Meraki dashboard to Security & SD-WAN –> Site to Site VPN. Enable VPN if you haven’t already, and set the “VPN Mode” to “Enabled” for the subnets that you want to participate in the tunnel.
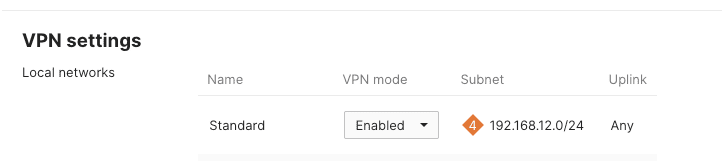
Then, head down to IPsec VPN peers, and click + Add a peer. A lot of these config choices are going to be dependent on how you want to configure your particular tunnel, but let’s break it down into two sections.
Peers
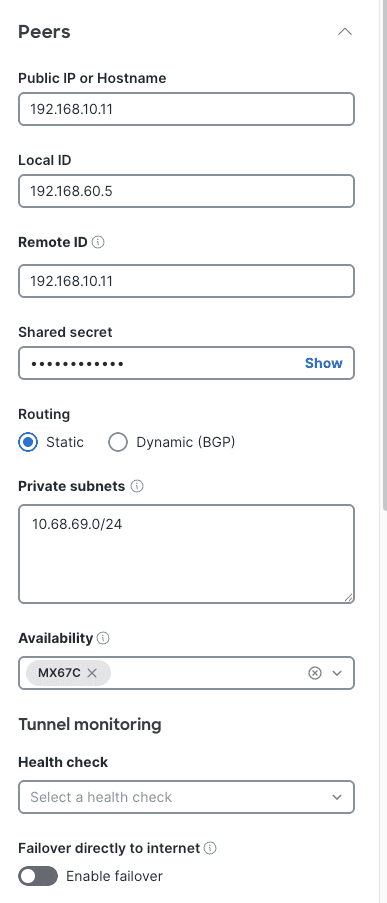
Public IP or Hostname – If that IP is behind another NAT environment (or over the internet), put the Public IP of where the lab device is located. If it’s on your same local network, you can put the Private IP. You can also put a hostname, as long as the MX can resolve that hostname to the correct IP.
Local ID – the MX defaults to using it’s WAN IP (whether or not that is Private or Public, depending on your network environment). I’ve set my Local ID as the Private IP of my MX.
Remote ID can be whatever you’d like, but I like to make it the Private IP of the lab device/remote peer.
Shared secret can be any password you’d like, long as its the same on both sides.
Routing will be Static for this particular tunnel.
Private subnets will be the subnet, or subnets that are being shared from the remote peer to us. In my example, I’ve picked just 10.68.69.0/24 as a dummy subnet on the lab device.
Availability is what MX devices in your organisation will use this configuration. If you have many networks in the organisation, you should set an Availability tag for your particular network. Otherwise, you can also set it to All networks. I’ve set it to my particular MX’s network.
Tunnel Monitoring config is outside the scope of this blog post, and relates to Dynamic health checks to keep an eye on the tunnel health.
IPsec policy
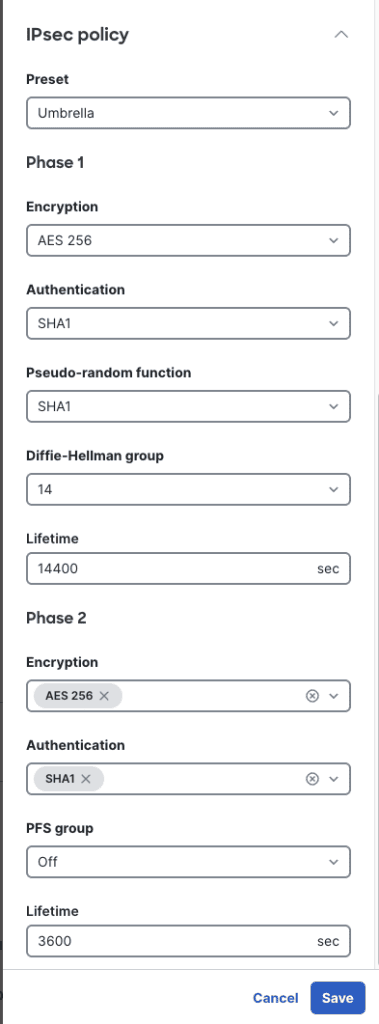
It’s easiest to use one of the Presets for your Phase 1 and Phase 2 settings. The names are just to refer to specific vendors default configuration settings, but you can use them with any tunnel.
In my case, I’m going to use the Umbrella preset, but you can otherwise manually configure any combination of groups, as long as it’s configured the same on the other side.
Make sure to save changes on the dashboard, and confirm that the MX has recently fetched its configuration.
Configuring swanctl.conf on Strongswan
Now that we’ve configured the Meraki side, we now need to match that config in our swanctl.conf file – the default directory is /etc/swanctl/swanctl.conf. Edit this with your favourite text editer, and add this configuration:
connections {
  Phase1-Meraki {
    local_addrs=192.168.10.11
    remote_addrs=192.168.60.5
    version=2
    proposals=aes256-sha1-modp2048
    reauth_time=14400

   local {
      id=192.168.10.11
      auth=psk
    }

    remote {
      id=192.168.60.5
      auth=psk
    }

    children {
      Phase2-Meraki {
        local_ts=10.68.69.0/24
        remote_ts=192.168.12.0/24
        esp_proposals=aes256-sha1
        life_time=3600
      }
    }
  }
}
secrets {
  ike-1 {
    secret = "MerakiTunnel"
  }
}
All we’re doing is matching what was configured on the Meraki side. The local_addrs is the Raspberry Pis Private IP, and since I can reach the MX locally, the remote_addrs is the Private IP of the MX. If it’s over the internet, you would put the Public IP of the MX instead.
version=2 is straight forward – we’re doing an IKEv2 tunnel.
proposals match what we have configured for the MX – AES256, SHA1, and DH group 14 correlates to MODP2048.
reauth_time matches the Lifetime value.
local refers to the Local ID. The Local ID of the Raspberry Pi should match the Remote ID configured on the dashboard. It can be anything, as long as they match.
remote refers to the Remote ID. The Remote ID of the Raspberry PI should match the Local ID configured on the dashboard. It can also be anything, as long as they match.
local_ts is the subnet that our Strongswan instance is advertising (which should match the Private subnets on the dashboard)
remote_ts is the subnets that are Enabled for VPN on the Meraki dashboard.
esp_proposals are the Phase 2 settings, which is AES256 and SHA1.
life_time is the Phase 2 lifetime value, which is 3600 seconds in this case.
secrets is where you configure the PSK password configured on the Meraki dashboard.
Once you’ve added this in, and saved the file, reload all configuration with the following commands.
swanctl -q
swanctl -r
Forming the tunnel between the Cisco Meraki MX and Strongswan
To form the tunnel, we can run the following command from the Raspberry Pi. I explain more about the syntax here: Configuring Strongswan 5.9.8 with swanctl on Raspberry Pi OS. Make sure to be a root user.
swanctl -i -i Phase1-Meraki -c Phase2-MerakiIf it was all configured correctly, we should see something like this, and have the tunnel formed.
root@raspberrypi:/home/burstbytes# swanctl -i -i Phase1-Meraki -c Phase2-Meraki
[IKE] initiating IKE_SA Phase1-Meraki[2] to 192.168.60.5
[ENC] generating IKE_SA_INIT request 0 [ SA KE No N(NATD_S_IP) N(NATD_D_IP) N(FRAG_SUP) N(HASH_ALG) N(REDIR_SUP) ]
[NET] sending packet: from 192.168.10.11[500] to 192.168.60.5[500] (464 bytes)
[NET] received packet: from 192.168.60.5[500] to 192.168.10.11[500] (472 bytes)
[ENC] parsed IKE_SA_INIT response 0 [ SA KE No N(NATD_S_IP) N(NATD_D_IP) N(FRAG_SUP) N(HASH_ALG) N(CHDLESS_SUP) N(MULT_AUTH) ]
[CFG] selected proposal: IKE:AES_CBC_256/HMAC_SHA1_96/PRF_HMAC_SHA1/MODP_2048
[IKE] authentication of '192.168.10.11' (myself) with pre-shared key
[IKE] establishing CHILD_SA Phase2-Meraki{2}
[ENC] generating IKE_AUTH request 1 [ IDi N(INIT_CONTACT) IDr AUTH SA TSi TSr N(MOBIKE_SUP) N(ADD_4_ADDR) N(MULT_AUTH) N(EAP_ONLY) N(MSG_ID_SYN_SUP) ]
[NET] sending packet: from 192.168.10.11[4500] to 192.168.60.5[4500] (268 bytes)
[NET] received packet: from 192.168.60.5[4500] to 192.168.10.11[4500] (268 bytes)
[ENC] parsed IKE_AUTH response 1 [ IDr AUTH SA TSi TSr N(MOBIKE_SUP) N(ADD_4_ADDR) N(ADD_6_ADDR) N(ADD_6_ADDR) ]
[IKE] authentication of '192.168.60.5' with pre-shared key successful
[IKE] peer supports MOBIKE
[IKE] IKE_SA Phase1-Meraki[2] established between 192.168.10.11[192.168.10.11]...192.168.60.5[192.168.60.5]
[IKE] scheduling reauthentication in 13342s
[IKE] maximum IKE_SA lifetime 14782s
[CFG] selected proposal: ESP:AES_CBC_256/HMAC_SHA1_96/NO_EXT_SEQ
[IKE] CHILD_SA Phase2-Meraki{2} established with SPIs c3be625d_i c6933712_o and TS 10.68.69.0/24 === 192.168.12.0/24
initiate completed successfully
root@raspberrypi:/home/burstbytes#
We can also see the tunnel stats here:
root@raspberrypi:/home/burstbytes# swanctl -l
Phase1-Meraki: #2, ESTABLISHED, IKEv2, ac5d57c0ab643106_i* 54eb2fe5bd69983b_r
  local  '192.168.10.11' @ 192.168.10.11[4500]
  remote '192.168.60.5' @ 192.168.60.5[4500]
  AES_CBC-256/HMAC_SHA1_96/PRF_HMAC_SHA1/MODP_2048
  established 127s ago, reauth in 13215s
  Phase2-Meraki: #2, reqid 1, INSTALLED, TUNNEL, ESP:AES_CBC-256/HMAC_SHA1_96
    installed 127s ago, rekeying in 3473s, expires in 3473s
    in  c3be625d,      0 bytes,     0 packets
    out c6933712,      0 bytes,     0 packets
    local  10.68.69.0/24
    remote 192.168.12.0/24
root@raspberrypi:/home/burstbytes#
Creating a Virtual interface to test connectivity
Now, we want to create a interface on the Raspberry Pi to test pings from the MX itself. These steps should be identical on Ubuntu and Debian based Linux devices, otherwise consult your specific distro’s config.
Load the dummy module:
sudo modprobe dummyCreate a dummy interface for the IP of your choice. In my case, I’m doing 10.68.69.1 (since thats an IP in the subnet I advertised):
sudo ip link add dummy0 type dummy
sudo ip addr add 10.68.69.1/32 dev dummy0
sudo ip link set dummy0 up
Ping from the IP that you’ve assigned, to an IP on the MX side (I’m pinging the VLAN interface IP 192.168.12.1 on the MX):
root@raspberrypi:/home/burstbytes# ping 192.168.12.1 -I 10.68.69.1
PING 192.168.12.1 (192.168.12.1) from 10.68.69.1 : 56(84) bytes of data.
64 bytes from 192.168.12.1: icmp_seq=1 ttl=63 time=5.42 ms
64 bytes from 192.168.12.1: icmp_seq=2 ttl=63 time=12.3 ms
64 bytes from 192.168.12.1: icmp_seq=3 ttl=63 time=8.62 ms
64 bytes from 192.168.12.1: icmp_seq=4 ttl=63 time=7.82 ms
64 bytes from 192.168.12.1: icmp_seq=5 ttl=63 time=16.2 ms
^C
--- 192.168.12.1 ping statistics ---
5 packets transmitted, 5 received, 0% packet loss, time 4006ms
rtt min/avg/max/mdev = 5.421/10.073/16.202/3.777 ms
root@raspberrypi:/home/burstbytes#
Similarly, from the Cisco Meraki dashboard try to ping 10.68.69.1 from the VLAN interface IP that you have Enabled for VPN on the Tools section of the Appliance Status page.

Check the output of swanctl -l again, to see the incrementing “in” and “out” counters, confirming that traffic is passing through the tunnel:
root@raspberrypi:/home/burstbytes# swanctl -l
Phase1-Meraki: #2, ESTABLISHED, IKEv2, ac5d57c0ab643106_i* 54eb2fe5bd69983b_r
  local  '192.168.10.11' @ 192.168.10.11[4500]
  remote '192.168.60.5' @ 192.168.60.5[4500]
  AES_CBC-256/HMAC_SHA1_96/PRF_HMAC_SHA1/MODP_2048
  established 410s ago, reauth in 12932s
  Phase2-Meraki: #2, reqid 1, INSTALLED, TUNNEL, ESP:AES_CBC-256/HMAC_SHA1_96
    installed 410s ago, rekeying in 3190s, expires in 3190s
    in  c3be625d,   6300 bytes,    75 packets,    22s ago
    out c6933712,   6300 bytes,    75 packets,    22s ago
    local  10.68.69.0/24
    remote 192.168.12.0/24
root@raspberrypi:/home/burstbytes#
Check the Cisco Meraki VPN Status page to confirm that the tunnel is up and operational.

Summary
This post was to show you how quick and easy it is to test a IKEv2 tunnel using a Cisco Meraki MX and an open sourced VPN client Strongswan. This is great to quickly test use cases, and also to confirm that your devices are working as expected in a lab scenario. Dummy interfaces also allow you to quickly test real-world traffic based scenarios and confirm that routing is working as well.
Get notified whenever I post something new. No spam, and it helps a lot!


Leave a Reply